Thank you for your interest in Crowdmark. Now that you have access to the platform, here are some helpful tips to help you navigate and experiment with the features we offer.
1. Creating a course
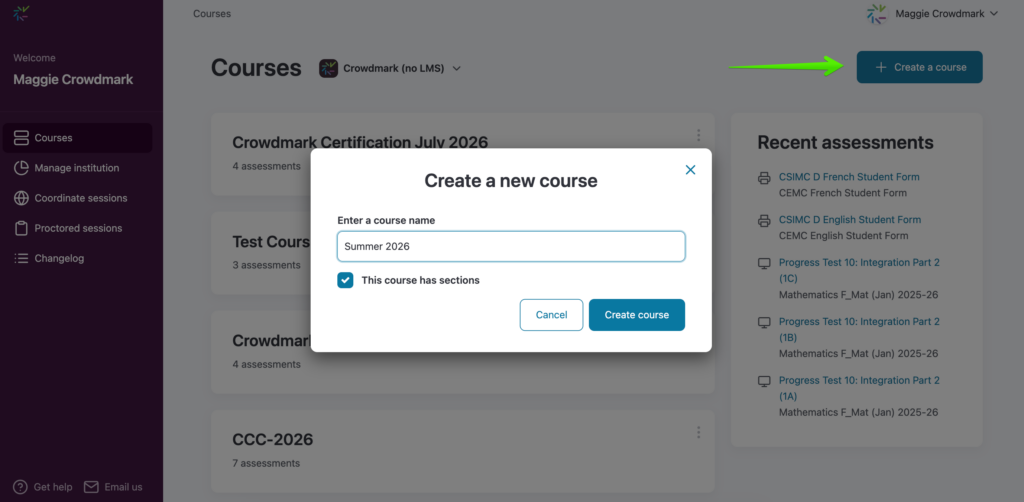
Your Crowdmark home page is the My Courses page, where you can view existing courses and create new ones.
Click the Create a course button and enter the name of your course. If your course has sections, you can specify that here.
If you’ve signed in through your institution’s LMS (Learning Management System), you may see a button to Import a course instead.
2. Enrolling students
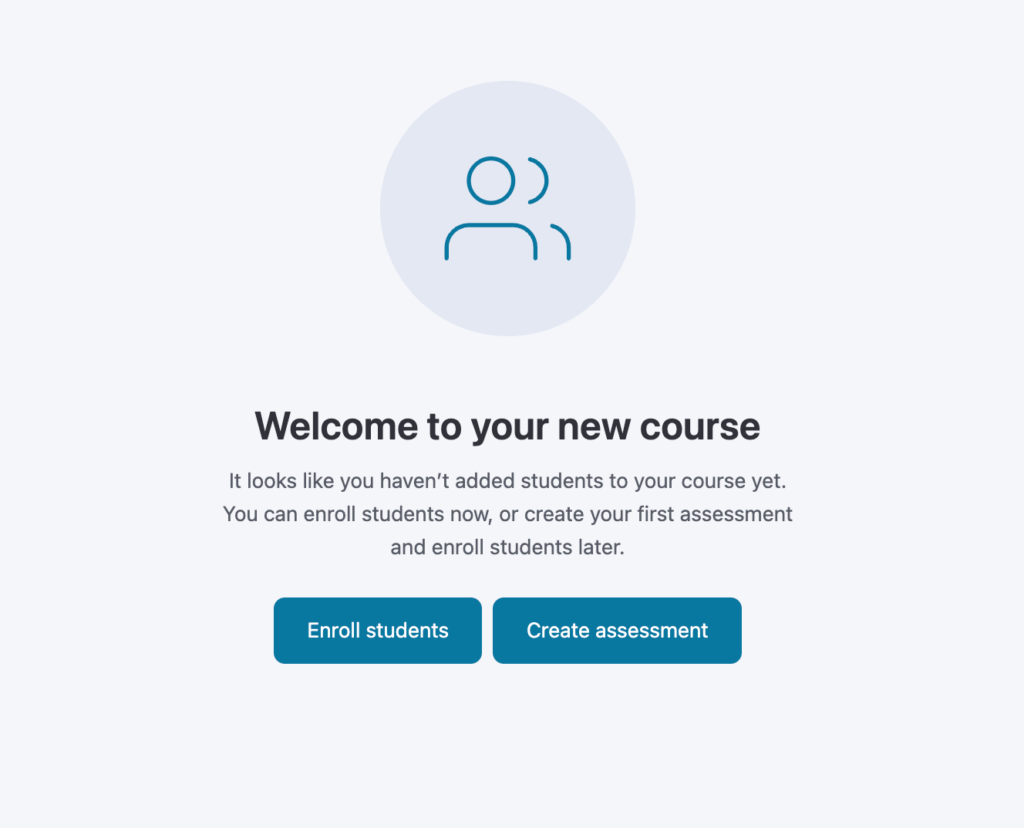
To enroll students you’ll need to upload a spreadsheet in CSV format. This CSV file must contain a column with student email addresses, but it is recommended to also include columns with first and last names, student numbers and section names. You may also wish to include yourself on the student roster so you can test and see what students see.
This file can likely be generated and exported from your LMS. If not, your institution’s IT department maybe be able to provide you with the student list.
If you imported the course from your LMS you will see a button to Import students (without needing a CSV file) instead.
It is also easy for students to get started with Crowdmark.
- Students are not notified when you enroll them into your course. Students are only able to see the course once an assessment has been distributed.
- Students do not need to create an account until you distribute the first assessment (you will be guided on how to do that further down this page). After distribution, students who are new to Crowdmark will be prompted to claim their account to access Crowdmark.
- This link for students provides more details: Claiming your account (signing in for the first time).
3. Creating an assessment
Crowdmark supports multiple types of assessments, divided into two basic categories: Administered (paper-based assessments) and Assigned (online assessments). For more information on the different assessment types and associated options for formatting, see Choosing an assessment type.
The following instructions will take you through a QR coded Administered assessment and an Assigned assessment.
a. Administered assessment – QR coded
See full video transcript and instructions
-
- Start by clicking Create assessment, name your assessment and select the Administered (in-person) assessment type.
- Choose the Upcoming assessment option to create a QR-coded assessment template in Crowdmark. You’ll also see an option for Ready to grade, which is a new workflow coming soon! Use the Previous button to change anything, or click Finish to complete your assessment creation.
- The Assessment setup page will guide you through the rest of your setup. On this page you can use the Roster functions to choose which students will write the assessment, as well as which teammates will grade it. You can also manage your comment library from this page.
- Set up your assessment template as a PDF file. This can be an assessment you’ve already created and used in the past, but may require some modification for Crowdmark’s formatting. Crowdmark places a QR code on every page as a way to organize student submissions and streamline grading. Your template must have a cover page where students can write their names and other information, but this page will not be visible for grading so it should not have any questions on it. See Creating an assessment template for details.Note: If you want to be able to grade or refer to your students’ notes or scratch pages, include blank pages in the template so they have QR codes—otherwise they will not show up for grading in Crowdmark.
-
- Drag and drop or click to browse to upload your assessment template to Crowdmark. You’ll be able to preview it to make sure the formatting is correct. If not, you can click Try again to make changes and re-upload your template.Once you have uploaded your template, decide which options to enable:
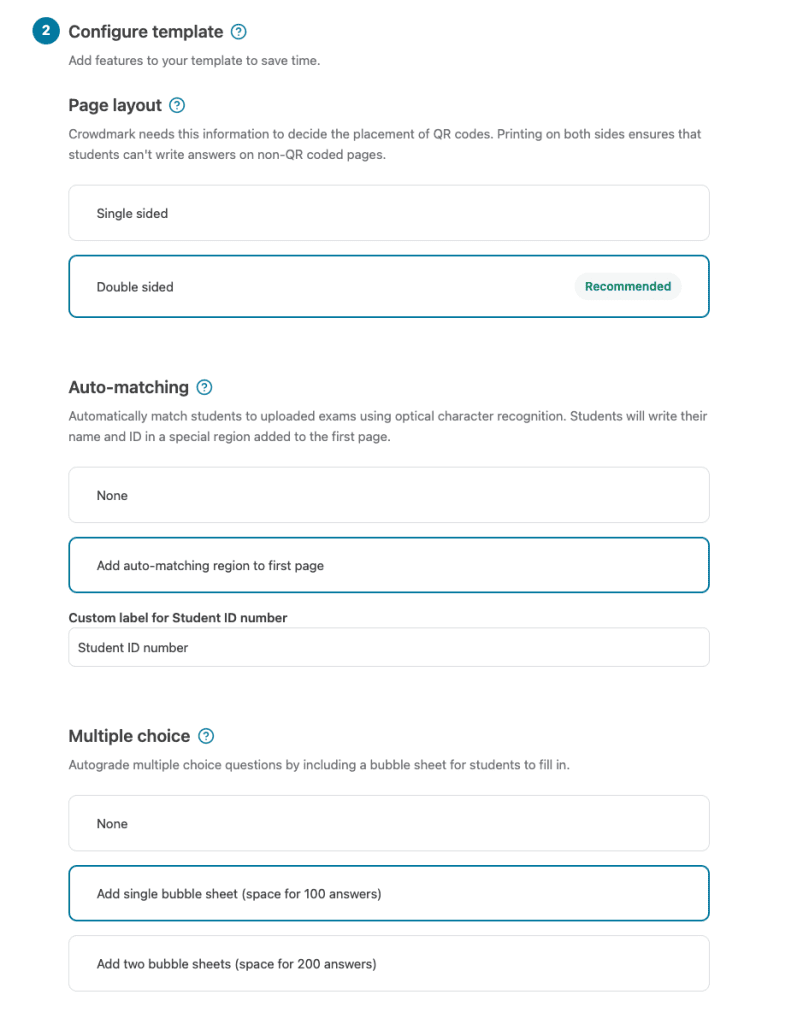
- Double-sided printing is recommended to avoid students placing work on pages without QR codes.
- Automated matching will use optical character recognition to match your students’ booklets to their names and ID numbers in Crowdmark. It requires you to leave space on your template’s cover page. See Creating an assessment template for specifics.
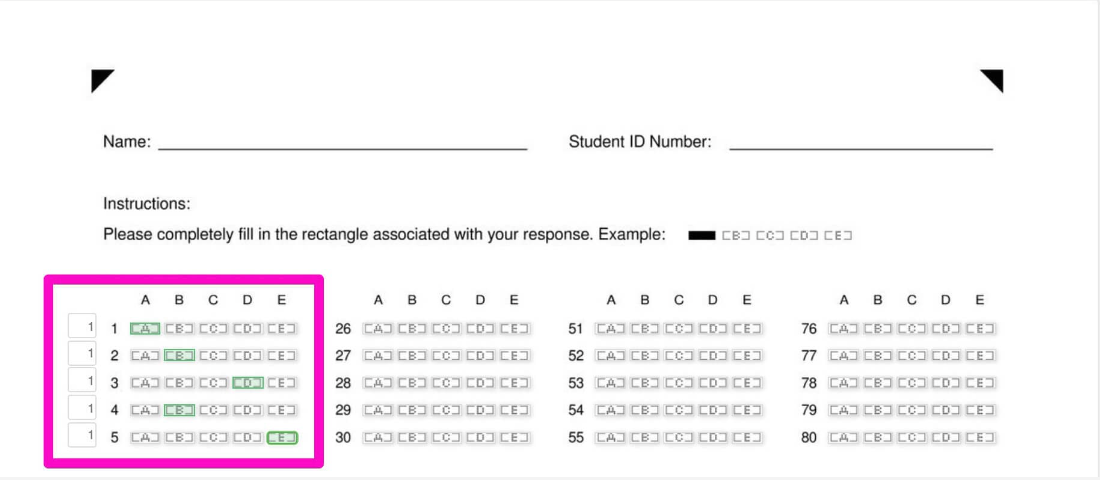
- Multiple choice will add bubble sheet(s) at the end of your template. You can select a maximum of 2 bubble sheets, adding up to 200 multiple choice questions
- Decide how many extra booklets to include in your printable PDF. Since each QR code is unique to each page, booklets can’t be duplicated, and extra booklets can’t be created later. This means you’ll need to make sure your course roster is up to date, or add enough extra booklets to account for students who may enrol later.
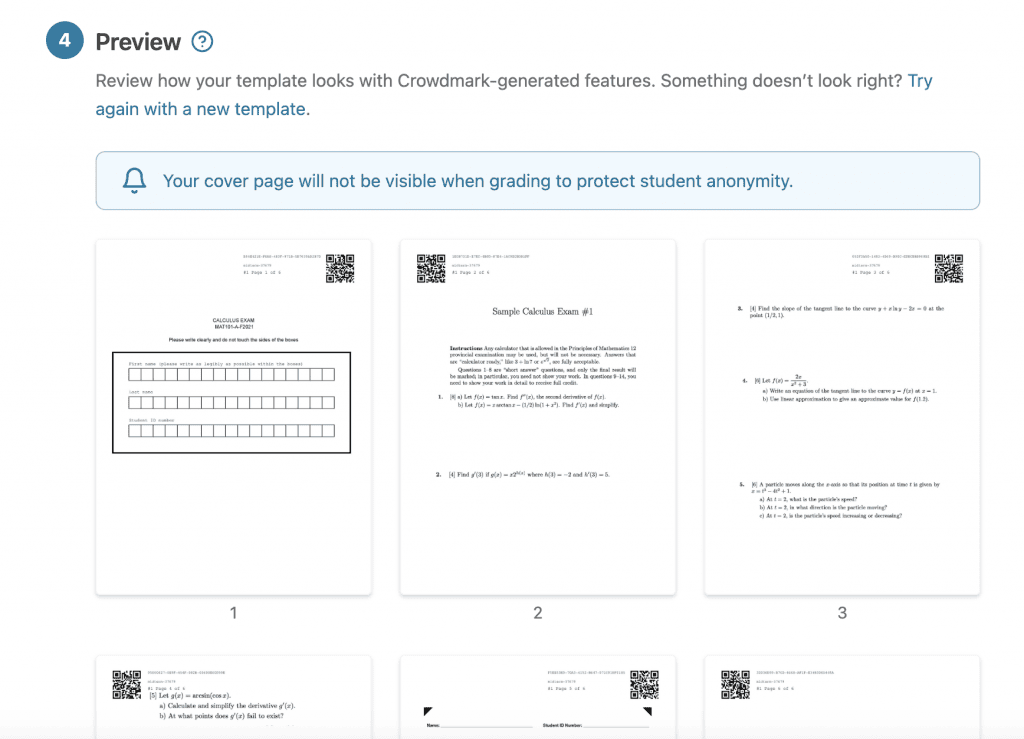
- Click Generate preview to show a preview of your template including QR codes and other Crowdmark formatting. If there’s an issue with the template formatting, click Try again with a new template. Once you are satisfied with the formatting, click Save template and generate unique booklets to start creating the PDF file that will contain all the booklets for the assessment. This is what you’ll send to the printer. Once the generation is complete, click Download booklets. It’s good to make sure this file gets saved somewhere you’ll be able to find it easily, and you’re able to re-download the file from the Template tab at any time.If you’re working with a print shop for printing and/or scanning, you can invite them to download the file and upload scanned booklets directly to Crowdmark. See Inviting a printer or uploader to your team to learn more.
- Drag and drop or click to browse to upload your assessment template to Crowdmark. You’ll be able to preview it to make sure the formatting is correct. If not, you can click Try again to make changes and re-upload your template.Once you have uploaded your template, decide which options to enable:
-
- Next, you will need to define the location of each question in your template so Crowdmark can separate them for grading. You can set a question’s Label and Max. points as well as indicate if the question is a Bonus. To learn more about defining questions, see Defining questions.If you’re using bubble sheets for multiple choice questions, you do not need to define the locations of the MC question prompts as the bubble sheet will be graded automatically.

If you’re using bubble sheets for multiple choice questions, you will be prompted to fill out the Multiple choice answer key. Crowdmark will automatically grade students’ responses in the bubble sheets using the correct responses you have indicated in the answer key. Click on the MC letter bubbles to select or deselect the correct responses. For more information on the answer key and multiple choice settings, see Using multiple choice questions in an administered assessment.
Your assessment is now ready for printing and distribution!
-
- Once the assessment has been written, you’ll need to scan the booklets to a PDF file (or multiple files if you have a lot of booklets) to upload to Crowdmark for grading. See Scanning assessments for best practices to make your scans readable by Crowdmark as well as your graders.When you click Manage scans, you’ll see a screen where you can drag and drop or browse for your PDF file. Crowdmark will process the QR codes to ensure that each page goes to the correct location for grading. If a QR code can’t be read, you will see an error message. See Fixing errors in assessment upload to learn more.If you have a colleague whose job is to scan and upload your assessments, or if you are working with a print shop, you can invite them to upload the file(s) directly to Crowdmark. See Inviting a printer or uploader to your team for more information.Note: Because of the QR codes, booklet pages don’t need to be in order when scanning and uploading—Crowdmark will organize them for you!
-
- Next, the booklets will need to be matched to the students who wrote them. If you’re using automated matching, Crowdmark will read the names and student ID numbers that students filled out in the boxes on the front of the assessment to match automatically
If you did not enable automated matching, or if there are booklets that did not match, they can be matched manually by clicking Manual matching. Search for student information, then click the checkbox to select a student to match. See Matching booklets to students for full instructions.

Your assessments are uploaded and booklets are matched. Congratulations, You’re ready to start grading!
b. Assigned assessment
See full video transcript and instructions
-
- Start by clicking Create assessment, name your assessment and select the Assigned (online) assessment type.
- Choose whether students will submit as an individual or a group. Click here to learn about group assessments. Use the Previous button to change any settings, or click Finish to complete your assessment creation.
- The Assessment setup page will guide you through the rest of your setup. On this page you can use the Roster functions to choose which students will write the assessment, as well as which teammates will grade it. You can also manage your comment library from this page.
- Follow the prompt to create the question prompts for the assessment. Markdown and LaTeX can be used to format text and attach files in the description and question boxes. You can also create question groups to be distributed randomly across student assessments. The questions can be edited later on, if needed. You can also click the Preview button to see a student’s view of the assessment. See more about question types and formatting here.
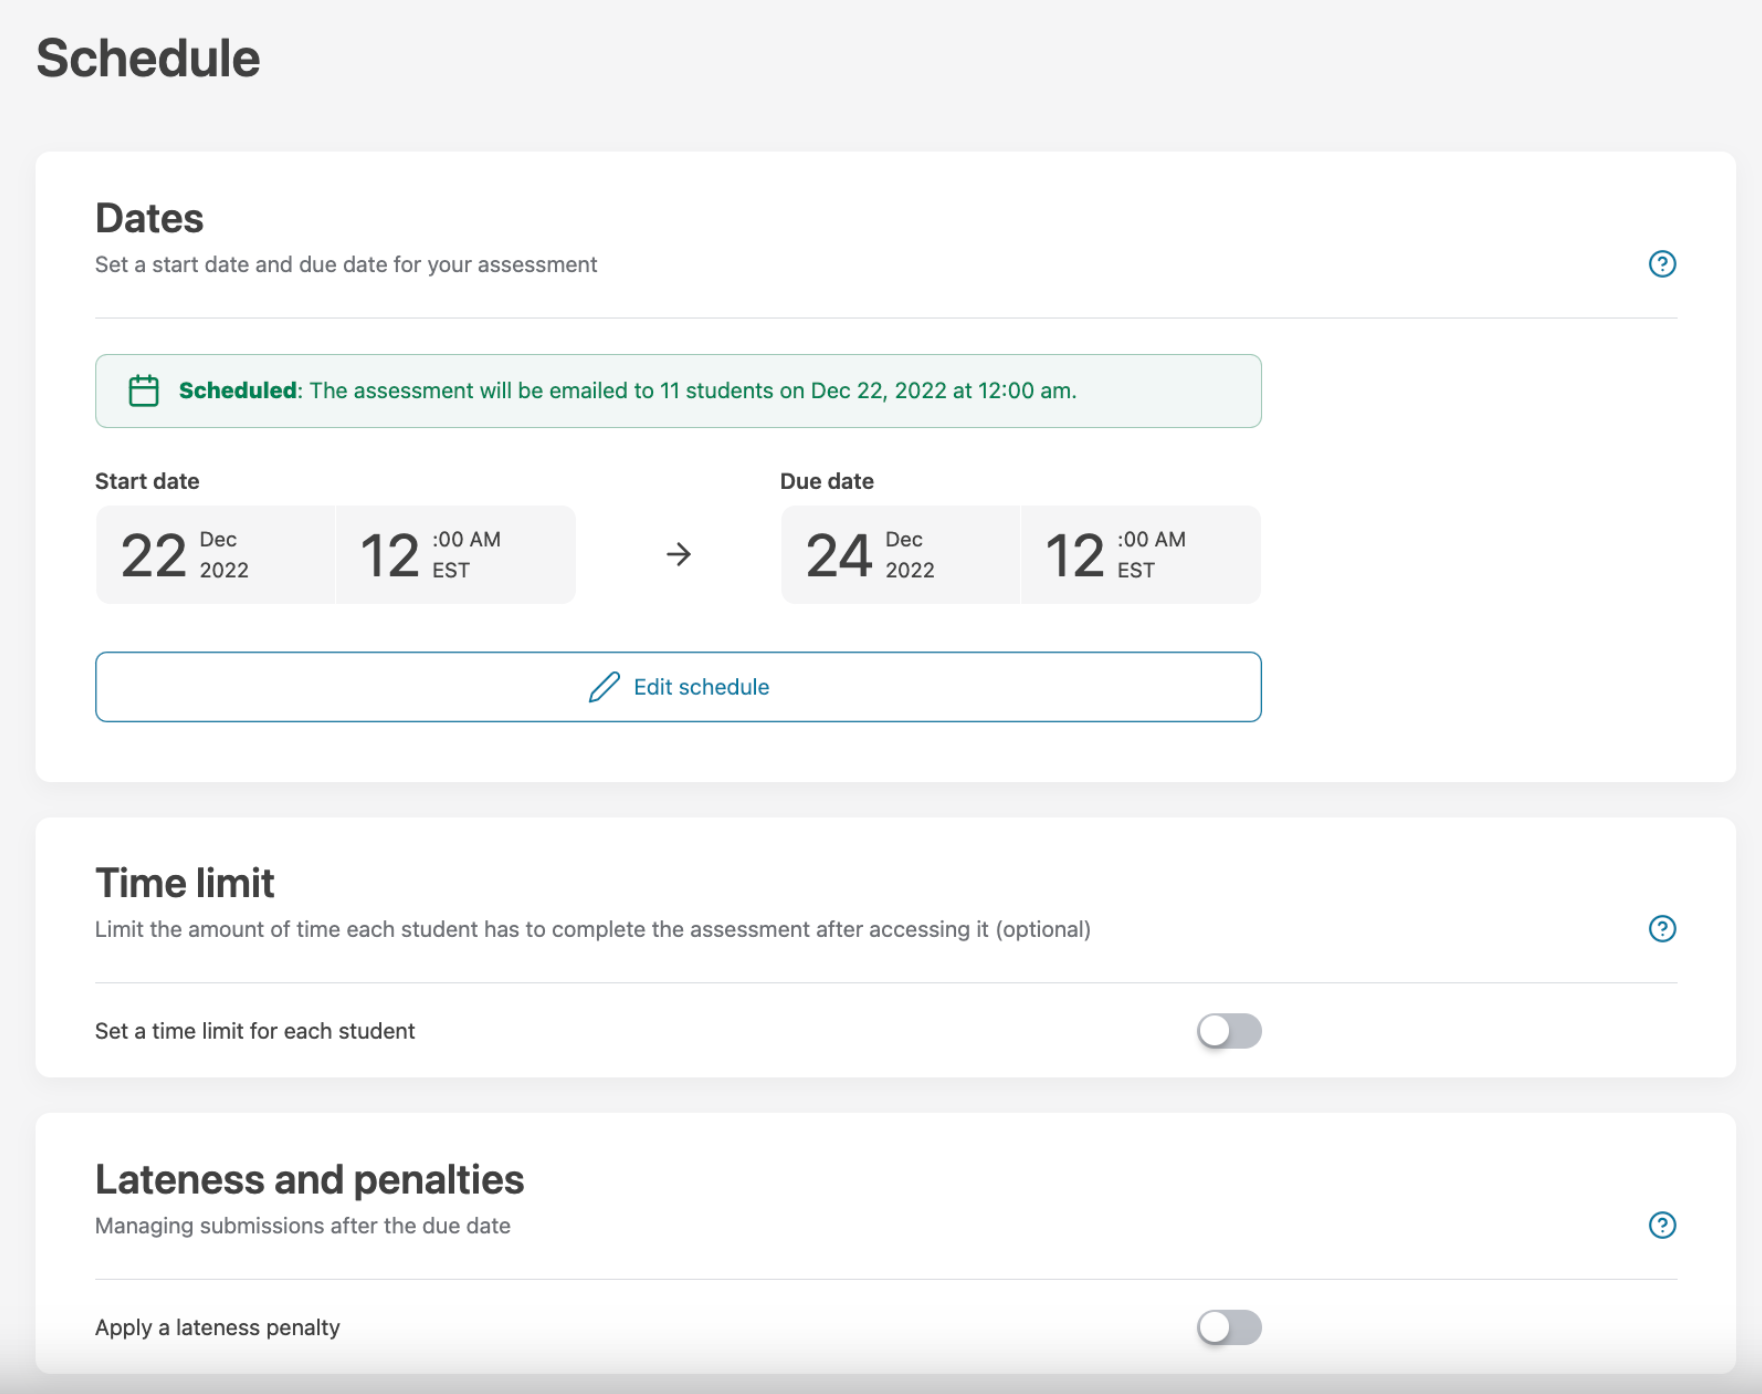
- Follow the prompt to the Scheduling and distribution page, where you can Distribute now or Schedule distribution for a later date and time. If the exam is synchronous exam, where all students will write at the same time, you can use the scheduled distribution function to send out the exam at the designated time. On this page you can also add a timer for a Timed assessment, and lateness penalties. These can also be adjusted on a per-student basis using the accommodation options (link)

- Once an assessment has been distributed, you can click on the Students tab to see if students have received or viewed the assessment, and track their submissions in the Submission status column.The Submission status is also where you can adjust an individual student’s due date, assessment timing window, or late penalty. If a student has such accommodations in place, you’ll see a gear icon beside their status.
Check out the following docs in our Help Center for more detailed instructions on creating Assigned assessments:
Here are some great articles to share with students:
4. Grading
See full video transcript and instructions
Once students have submitted work and the due date has passed, you’ll see the submissions organized by question in the Grading panel. This is a helpful organizational tool that allows a team of graders to easily divide up work and grade one question or one student at a time.
Click into a question to enter the grading interface. Here you’ll see different options for grading, depending on the type of response your students have submitted. For Image/PDF upload responses, you’ll see hand drawing, stamps, highlighting and colour options, as well as comments. For Text responses, you’ll find a cursor, highlighter, strikethrough and colour options, as well as comments. Multiple choice questions are automatically graded upon submission. Any comments you leave on student work are automatically saved, building a comment library that can be reused in later assessments. You can use Markdown, LaTeX, images or links in comments, as well as assigning positive or negative point values.
On the right hand side of the screen you can enter a score for the student’s response, move through booklets and enter tags to bookmark or for reference later on.

For more detailed instructions check out our Help Center section on Grading.
5. Returning student work
When grading is complete, you can click into the Results tab of the assessment to see a graph of student performance, return student work, export the grades to a CSV file, and export the graded booklets for your files.
If the course is connected to your LMS, you will also be able to export grades directly to the LMS gradebook.
In the Student view settings, you can click Edit to include a message when you return student work.
To return student work, including with your grading and feedback, click Send grades to students. Each student will receive an email notification with a link to view their work in their Crowdmark account. They are able to see all the markup and feedback you’ve left on their assessment.

Once a student has completed multiple assessments, they’re able to access a Performance report in their Crowdmark account. This report allows the student to see their progress across assessments in a course, as well as highlighting their strongest and weakest performance points throughout. This information helps students to focus their learning, and gain a deeper understanding of their progress.
Check out this Help Center doc for more detailed information: Returning graded assessments
For help with or more details about a specific LMS integration, check out the Help Center sections below:
- Exporting grades to Blackboard’s gradebook
- Exporting grades to Canvas’s gradebook
- Exporting grades to Brightspace’s gradebook
- Exporting grades to Moodle’s gradebook
Congratulations!
You’ve now successfully navigated your first Crowdmark assessment!
For further information regarding your upcoming academic term or questions about your Crowdmark contract, contact Virginia Woodall at graeme@crowdmark.com.
For questions about the Crowdmark software, your account or other technical information, contact Crowdmark Support.
To request a custom training session for you or a group, click here.